Scrapbooking SOS - is all about why I scrapbook. I scrap for me, my sanity and
for my creativity. Of course, my family benefits from it too.
Showing posts with label Kids. Show all posts

Tuesday, April 30, 2019

Sketch Challenge

I really wanted to use up some papers that had been in my stash for a while. But, I was having a hard time getting it to work. Until I found this one page layout challenge. My daughter had just got a new loft bed and it all just worked!

Here is the sketch:

So, after turning the sketch on it's side. I got her page done.
Used Cricut CTMH Artbooking for the circle cut at 5 1/2" (trimmed to half that I wanted).
Alpha stickers that could have been my 1st set I ever possibly bought! 
   

Friday, March 1, 2019

National Cheese Pizza Day Layout

It has been a while!
Here is a page I did with my kiddos for National Cheese Pizza Day!
Used Cricut - CTMH Artbooking cartridge to make "pizza" with Font Layer 1" 

Friday, March 27, 2015

Fiskafriends - The Power of Community Blog Hop - March 27th to 29th

Welcome to the 1st Fiskafriends Blog Hop

FISKAFRIENDS - THE POWER OF COMMUNITY BLOG HOP

Who We Are: Over 140 numbered Fiskateers wanted to maintain the community they cherished, and so the Fiskafriends Facebook group was created.  For privacy reasons, the group FB status is secret, however any numbered Fiskateer is welcome to join the group. 


March 27th-29th, we are celebrating our First Anniversary with a Fiskafriend Blog Hop.  You do not have to be a Fiskafriend to visit and comment on our bloggers' posts. This hop is open to everyone! International visitors included! The theme of the hop is Anything Goes, so be prepared to find a variety of creative projects and ideas. 


So, on to my post for the 1st Fiskafriends Blog Hop
I am sure we have a great line up for you! You have probably came through a few blogs already. Last would have been Fiskateer #6857 Teresa's blog "Purple Bunny Paper Crafts"
If you miss any links you can always go back to Fiskafriends blog for the links. I have come to know many of these bloggers and love seeing their creations.

I have a (PHD) page for you! 
What is a PHD? Somewhere in my scrapbooking adventure I found this term...Which stands for Page(s) Half Done (PHD)...I loved it because I usually have a few of these! Usually after a crop or retreat, I end up forgetting something or just need to find the date for the event. I ended up making a D-ring Binder just for my PHDs!

My PHD page has been started a few years ago, actually in the United States! It made it's way to Canada and finally became a finished page!

I started the page in the United States with only my pictures matted and attached to the layout, but it was just needed a boost that missing something!

So, after packing up, moving and finally unpacking my PHD Binder. I got to play again! This time with a new Scrappy Friend in Canada, who just happened to have been working on a page using the Create A Critter Cartridge! I cut out the horse and title words "Howdy" from that cartridge and my page began to take shape.
 I still wanted a little more to play off my daughter's cowboy hat. The one she was wearing and the one she placed on our boy, Skipper during his afternoon nap. Using the star and cowboy hat images from A Child's Year I cut them out in coordinating paper. Adding a bit of fiber to the cowboy, gave me the great title. Wrapping a bit of fibers through the star and attaching to the top of a journaling tag, I  finally got my page done!

Hope you enjoyed my page!

Don't forget to leave a comment to be eligible for the sponsored giveaways!
Follow the sponsor giveaway entry directions at FISKAFRIENDS.  One name will be chosen from each blog and entered into the drawing for sponsor's prizes. So, the more blogs you comment on the more your chances to be entered!!!!

Please go to FISKAFRIENDS for the complete list of blogs!
Fiskateer #11488 Nancy's blog "My Crafts" is up next!

I will be drawing a small RAK from my own blog comments at the end of the blog hop.
(For US/Canada Addresses Only)

Also, would love it if you would follow my blog!

HAPPY HOPPING!

Monday, March 2, 2015

1st Layout Completed for February's XOXO DT Challenge!

This month I got to use our lift twice!

Here is the 1st one I did using a Halloween Pic of my kids. I started off using the sketch of Kimmy's layout, but then it turned into something of my own creation!
A button cluster in the top corner using a spider I had cutout previously but didn't use on another layout! 

I had used these two cool Halloween themed punches at a scrapbooking retreat. So, I made an extra strip just in case! Got the chance to put it to use!

A pre-printed journal box, jack-o-lantern and a cat I had cut out, but never used, until now! 

As you can see it turned out as it's own creation...I started out using the sketch elements from Kimmy's layout! Then it became it's own!

Here's Kimmy's layout we had to go on!

Hope you got the chance to play along with us over at XOXO Scrapbooking!

Saturday, February 14, 2015

Happy Valentine's Day!

Here are the 3 cards I created for my 2 little monsters and the husband!

First, my oldest purple loving girl monster:

Next, my youngest always hungry boy monster:

My husband's card...Missing our trips to the city and I think he sometimes miss the view from above too! But not during this time of the year and high winds!

Sunday, January 11, 2015

Liftateers - Week #5

Feeding the Goat was a page page to do. 
I used the goats instead of the stars used on the page we were given.
I still have to find the date and journal on this one...but loved how those goats came out!


My Girl with Grandma feeding the goat before we went Blueberry Picking.

Here is the page we were given this week. This one is from Laura Vegas using Bella Blvd products.

Tuesday, October 28, 2014

Card Lifters and Liftateers are back! Week #1

I am happy to say the Card Lifters and Liftateers are back!
The Card Lifters and Liftateers used to be based exclusively on the Fiskar's sponsored forum called Fiskateers. Since that platform changed a while back we lifters were losing our mojo!
With the multiple platforms out there such as Pinterest...We lifters have found a way to continue! I will include a link when available to the original card or layout we are given to give credit and share the love! 

Here is my Week #1

Here is the card we were given for Card Lifters Week 1: found at http://nanceleedy.blogspot.com/2011/05/candy-butterflies.html


My Page Lift for Week #1


The layout we were given for Week #1: found at http://cindyscreations-cinmfoster.blogspot.com/2014/09/photo-bomb.html


Thanks and Spread the love!

Thursday, July 31, 2014

A walk in the park eyes closed!

Some pictures of my boy been awaiting a page! We went for a walk in the local park and he enjoyed it eyes closed!

Using the CTMH - Bugs & Hugs stamp set borrowed from a friend. I stamped the saying and fussy cut the caterpillar.

Cut out my title using Cricut - Boys Will Be Boys and the @ from Artbooking cartridges. The Cruisin' was in a few layers and colors.

Stamped the date using CTMH - March Word Puzzle and You are my Happy Alpha sets. Made my own kite matching one on patterned paper and fussy cut the tail of strings/bows.


Saturday, May 17, 2014

Retreat: Getting caught up with the Kids.

My daughter's 1st Birthday Photo Shoot Pic

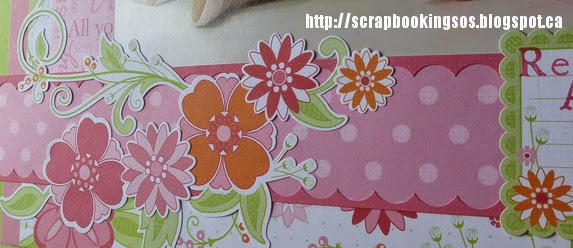
Layering Stickers into a cluster. Also used the leftovers from the scallop cut border with the sticker set. It is the pink placed on the lighter pink polka dot paper. Might add a few buttons to the centers. When I went to place this page in her album. I noticed the joining page had some.

A little strip left from that scallop border.

On to Baby Boy Pages 

Baby Boy arrives- Using up those older supplies in my stash.

Using those old stickers by placing them on same color cardstock, circle punched, and layered with another color in this case it was the kraft cardstock. Title I used rub-ons.

Baby Boy getting weighed

Used a quote from those old vellum Quote Books/Stacks. This one happened to be in a spinal binding. So, I punched some kraft cardstock with notebook border punch. Using Sew Easy zig-zag pierced stitch lines and hand-stitched in light blue making my own embellishment.  

Inked the edges of Cricut cut letters. "Here I Am!" fit so well with his little stretch pic. Funny 4 years later it is the same way he wakes up. A little stretch and "Morning" or "Come on the Sun's up"

Didn't know how to title this one. We were in recovery waiting for a room. So, I just used the vellum saying.

Using the same idea as before: sticker layered cardstock with some ribbon and a button/brad cluster.

Visitor's

Altered the saying for my title and staggered the tile cardstock letters to cover the vellum edge and adhere it the the page. Ric-rac on kraft cardstock hides the top edge of vellum and hides the glue so it stays on the page.

Added some ric-rac to the kraft cardstock to break up the patterns.

Baby Lo-Jack - We joked about this. When my daughter was born 2 1/2 years earlier we never saw one of these. Not sure how the term/title came out. Not sure if the term is universal. But in the USA when they started putting car alarm systems in one was called, LO-JACK. LO-JACK would track your car if stolen. So, in this case it was coined Baby Lo-Jack. Since the picture didn't fit the frame I added the jail bars using Cricut - CTMH Artbooking cartridge.

My 1st cut for the jail bars didn't fit like I wanted them so I found a way to used them and adhere my vellum saying down. Fits because the picture above is my daughter counting his toes.

A play on LO-JACK using a rub-on tricycle.

The full page:

Our 1st Anniversary - dressed up and heading to dinner. Used Webster's Pages Products and A LOT of Fussy Cutting. Placed the picture on top of a overlay/transparency. Positioned fussy cut flowers to cover the space that my photo wouldn't cover.

More Fussy Cutting & overlapped the frame sticker.

Loved this little gazebo. We were married at the foot of a larger gazebo.

Edge distressed tickets and layered with lace.

Vellum journaling ticket and chipboard button layered.

The completed page.


Until next time!